Introduction
Whether you rebuild your bathroom, upgrade your kitchen or give a fresh look at your living room, it is important to achieve the floor tile laying basics a surprising, long -lasting finish. Tiling may look like a simple DIY function, but without proper knowledge and technology even the most beautiful tiles can look worse or worse and uneven.
In this wide guide, we will drive you through 5 important stages of the floor tile laying basics, which will help you achieve innocent results, whether you take a full start or brush on your skills. From preparing the surface to sealing your excellent work, this article has everything you need to know to add floor tiles as a supporter.
Table of Contents
Step 1: Prepare the surface as a supporter
The basis for any successful tiling job begins very much before you place the first tile. The manufacture of the correct surface ensures adhesion, prevents future cracks and a level, equally contributed.What you need to do:
Remove the old floor: Remove the old tiles, blankets or vinyl.
Check the level: Use a straight and level to identify falls or high places.
Clean well: Swipe, scrub and vacuum to remove dust and debris.
Repair cracks: Fill the cracks with a suitable patch connection and allow it to dry.
Use the cement baking tray (if necessary): Especially important in wet areas such as bath.
Pro Tip: Never let prep work – this is an unusual whole of perfect tile installation.
Step 2: Measure Twice, Cut Once – Layout & Planning
The Art of Measuring and Marking
Before you attain for the adhesive, take time to plan your format. A well-concept-out design avoids awkward cuts and creates symmetry and stability.Key Tips:
Find the Center Point : Start from the center of the room and work outward.
Dry Fit Tiles First : Lay out tiles without adhesive to visualize spacing and sample.
Avoid Narrow Cuts : Try to keep away from reducing tiles less than half of their width near partitions.Use Spacers : Maintain steady grout strains throughout the floor.
Power Tool Suggestion: Laser stages can assist hold immediately traces and enhance accuracy. This step is mainly critical while operating with big-layout tiles or tricky styles.
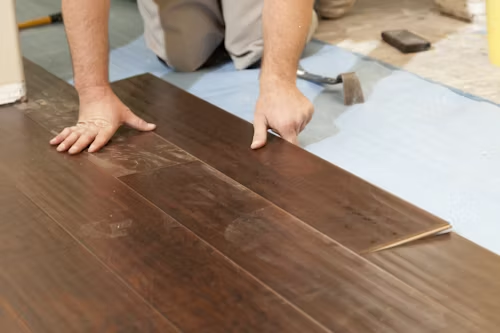
Step 3: Choose the Right Materials Adhesive
Grout, Hand to get time, Now comes the fun part – making tiles. This is the place there accurately and patience pays off. How to use glue: Mix Thinset -Morning according to the manufacturer’s instructions. Spread it evenly using a pointed putty at an angle of 45 degrees.
Work in small sections to prevent the glue from drying very quickly.Tile Supplement:
Press each tile to stick. Fold a little to make good contact .Use spacers to maintain uniform sealant. Check for the level frequently. Warning: Don’t hurry this step. It is difficult to fix uneven tiles to stand once. Glue treatment Perfect 24-48 hours before continuing for grouting.
Step 4: Grout, Clean and Sealing – Final Touch
When the glue is hardened, it’s time to bird floor tile laying basics and give them a polished, finished look.
Step-by-step grouting:
Mix the grout in a smooth, peanut butter -like stability.
Apply diagonally in tiles using rubber lye.
After 15-20 minutes, dry extra sealant with a damp sponge.
Let the sealant harden for 24-72 hours depending on moisture.
Roofs are important: Apply a penetrating seal to protect against stains and moisture.
Wait until the sealant is completely dry before sealing.
Remained per year for best results.Last tip: Buff tiles with a clean fabric after removing the fog and seal to increase the glow.
Conclusion – Mastering the Floor Tile Laying Basics
Mastery in the floor tile laying basics is not just about laying tiles – it’s about creating a place that lasts for years. With these five important stages, you now have the knowledge of handling your next floor project with confidence. Whether you do it yourself or hire a supporter, the floor tile laying basics ensure that you get the results you deserve: innocent, durable and beautiful floor.So grab your devices, measure twice and get ready to change your location at a time!
Bonus section: Common errors to avoid (and100 words)
Even experienced diyers can fall into the regular network. Avoid these losses:
Slog surface preparation,Wrong glue,Take part in the processing process,Detailed pairs,Ventilation ignored under sealant,A small plan goes a long way to make your tile color smooth and satisfactory.
Q1: What is Floor Tile Laying Basics?
A: Floor tile laying basics involve preparing the surface, measuring and marking, applying adhesive, placing tiles, cutting as needed, and grouting.
Q2: Can I tile directly over existing tiles?
A: Yes, if the existing tiles are firmly attached and the surface is clean and level, you can install new tiles over them.
Q3: What are the Floor Tile Laying Basics steps?
A: Prepare the subfloor, mark layout lines, apply adhesive, set tiles, cut as needed, let adhesive cure, then apply grout and seal if required.